Connect ChatGPT to your emails
Why connect ChatGPT to your emails?
ChatGPT is already part of your daily routine for writing, brainstorming and getting things done. But when it comes to email, you are still on your own — opening your inbox, reading through threads, typing replies one by one. This back-and-forth between ChatGPT and your mail client wastes time and attention.
With MailMCP, ChatGPT gains direct access to your mailbox. You can ask it to read your latest emails, search for a specific conversation, draft a professional reply, send a message or schedule one for later. All of this happens within the ChatGPT conversation — no copy-pasting, no tab switching.
MailMCP uses the Model Context Protocol to connect your IMAP/SMTP mailbox to ChatGPT securely. Setup takes about 2 minutes in the ChatGPT settings. MailMCP reads your emails only when ChatGPT asks for them, and never keeps a copy.
Connect ChatGPT to MailMCP
ChatGPT adds custom MCP servers through the Connectors settings, in Developer mode. Adding a custom connector requires Developer mode, which is available on the free plan too.
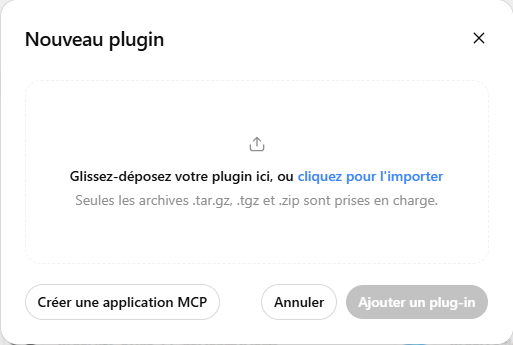
Depending on your ChatGPT version, this section is called « Connectors », « Apps & connectors » or « Plugins ». Turn on « Developer mode » first (Settings → Security and sign-in): without it, the « + » button only accepts a plugin archive and offers no field for a URL. Once it is on, « + » reveals « Create an MCP app », where you paste your server URL. No paid plan is required.
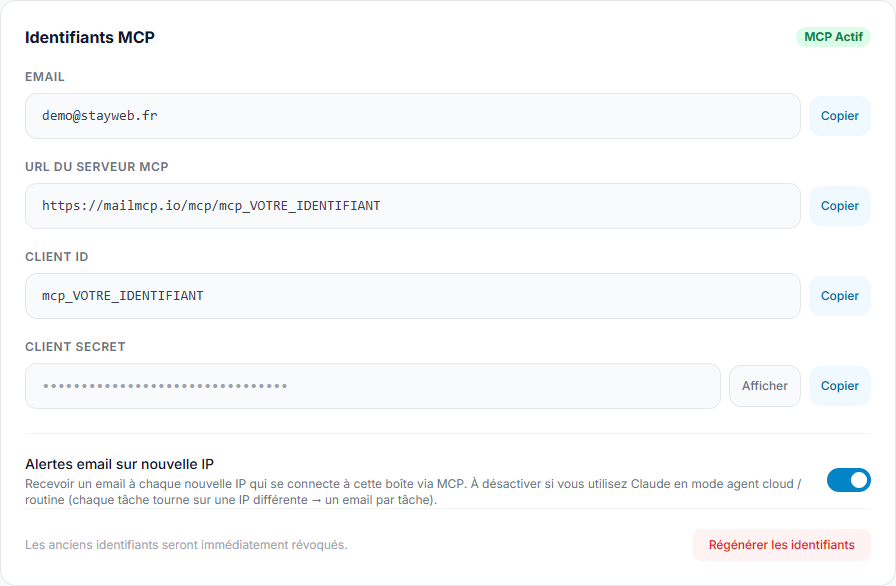
Copy your MailMCP server URL
In your MailMCP dashboard, open Email accounts and copy the connector URL of the mailbox you want to use. Each mailbox has its own URL.
MCP server URL
https://mailmcp.io/mcp/VOTRE_CLIENT_ID
Enable Developer mode
On chatgpt.com, open Settings › Security and sign-in, scroll down to Developer mode and switch it on. Nothing below works without this step.
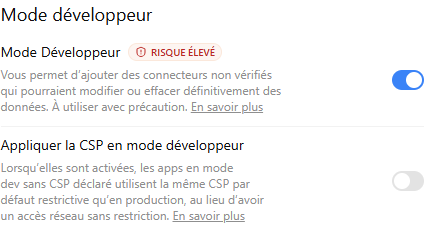
Developer mode is available on the free ChatGPT plan too — we checked the whole path on a free account. You will find it under Settings → Security and sign-in. Turn it on before step 3: without it, the « + » button only accepts a plugin archive and shows no field for a server URL.
Add a custom connector
Go to Plugins, click the + button at the top right, then Create an MCP app. That button only exists once Developer mode is on — otherwise the window just offers to upload an archive.
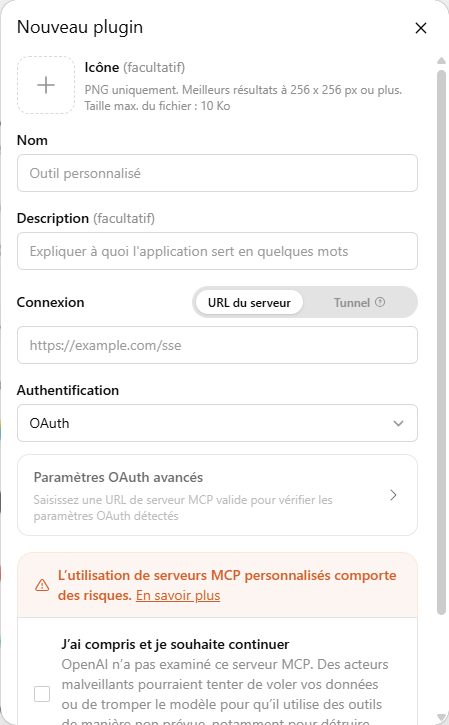
Fill in the form:
Name
MailMCP
MCP server URL
https://mailmcp.io/mcp/VOTRE_CLIENT_ID
Authentication
OAuth
Find your personal URL in your MailMCP dashboard, under Email accounts. Select OAuth as the authentication method — MailMCP handles the rest automatically.
Accept the security warning and authorize
OpenAI displays a warning: "Using custom MCP servers involves risks". Check the box "I understand and wish to continue" then click on Create. ChatGPT offers to sign in with your connector. Click it, log into MailMCP, and approve the access on the consent screen. You can revoke it at any time from your dashboard.
Step-by-step version with every screen: the full ChatGPT guide
Ask for it by name in the conversation
Nothing happens on its own: in a new chat, name the connector in your request. This first command is usually the moment it clicks.
If it does not work
- The "+" button only offers to upload a file
- Developer mode is still off. Go back to step 2 — the Create an MCP app button does not exist until then.
- The Create button stays greyed out
- The confirmation checkbox at the bottom of the form has not been ticked yet.
- ChatGPT says it does not have this tool
- Name the connector explicitly in your request, and avoid temporary chats — they do not carry connectors.
- "Tool execution failed" after a few requests
- The free MailMCP plan allows 5 calls per day per mailbox. Once used up, calls are refused until the counter resets. The Pro plan raises it to 500 per day.
Note: OpenAI has not reviewed or verified the MailMCP application. This is normal for any custom MCP application (not published on the store). Your data flows directly via an SSL/TLS encrypted connection. You can revoke access at any time from the Connectors settings.
Why use MailMCP with ChatGPT?
Conversational email
Manage your inbox through natural language, just like chatting with an assistant.
Smart drafting
ChatGPT reads the thread context and drafts relevant, professional replies for you.
Schedule and organize
Schedule emails for the right time and organize your folders with simple commands.
Revocable access
Remove MailMCP access at any time from your ChatGPT Connectors settings.
Works with any mailbox
Gmail, Outlook, Yahoo, your company email — any IMAP/SMTP account is supported.
MailMCP offers a free plan to get started. For full sending access and as many mailboxes as you need, Pro plans start at 1.99 EUR/month.
Ready to connect your email to AI?
Create your account in 30 seconds and get your MCP credentials.
Start for free