ChatGPT Developer mode: the step that unlocks MCP
Adding a custom connector in ChatGPT takes four minutes — but one step is hidden in the settings, and without it the option to paste your server URL simply does not exist. Here is the full path, with screenshots.
Short answer: in ChatGPT, the "+" button on the Plugins page only accepts a packaged plugin archive. To paste a server URL you must first turn on Developer mode in Settings → Security and sign-in. A "Create an MCP app" button then appears behind that same "+", and that is where your MailMCP URL goes. This works on the free ChatGPT plan.
What you need
- A MailMCP account with at least one mailbox connected — the free plan is enough to test.
- A ChatGPT account. Developer mode is available on the free plan too — no paid subscription is required to add the connector.
Step by step
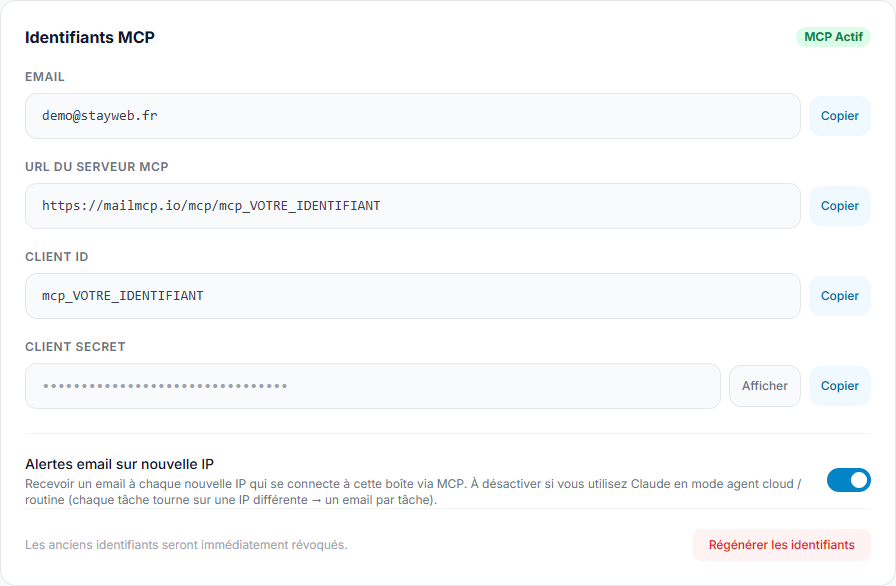
Copy your MailMCP server URL
In your MailMCP dashboard, open Email accounts and copy the connector URL of the mailbox you want to use. Each mailbox has its own URL — it contains your own identifier and must never be replaced by an example.
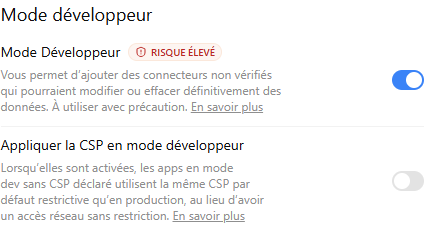
Turn on Developer mode — the step everyone misses
In ChatGPT, open Settings → Security and sign-in, scroll to Developer mode and switch it on. ChatGPT flags it as high risk because it lets you add connectors OpenAI has not reviewed — which is the case for any personal MCP server, including yours.
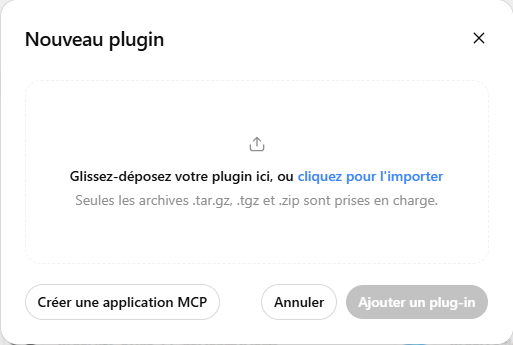
Plugins → "+" → Create an MCP app
Open the Plugins page and click the "+" button at the top right. Before step 2, this window only offered to upload a .zip archive. Now a Create an MCP app button appears at the bottom left — that is the one.
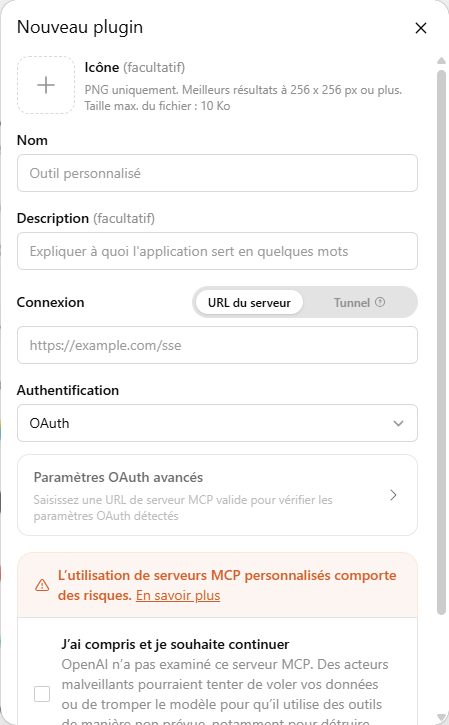
Paste your URL, keep OAuth, tick the box
Name the connector (for example "MailMCP"), paste your server URL in the Connection field, and leave Authentication on OAuth. The Create button stays greyed out until you tick "I understand and want to continue" — so do not skip it.
Authorise the connection
ChatGPT offers to sign in with your connector. Click it, log into MailMCP, and approve the access on the consent screen. You can revoke it at any time from your dashboard.
Ask for it by name in the conversation
Nothing happens on its own: in a new chat, name the connector in your request. This first command is usually the moment it clicks.
If it does not work
The "+" button only offers to upload a file
Developer mode is still off. Go back to step 2 — the Create an MCP app button does not exist until then.
The Create button stays greyed out
The confirmation checkbox at the bottom of the form has not been ticked yet.
ChatGPT says it does not have this tool
Name the connector explicitly in your request, and avoid temporary chats — they do not carry connectors.
"Tool execution failed" after a few requests
The free MailMCP plan allows 5 calls per day per mailbox. Once used up, calls are refused until the counter resets. The Pro plan raises it to 500 per day.
Keep reading about ChatGPT and email
Still stuck? A real person answers.
Tell us what you see on screen and we will look at your case — support is handled by the people who build MailMCP.
Contact support